
How you connect your sheet metal part to other parts matters. A lot more than most people think.
I’ve been looking at customer drawings for nearly twenty years. And honestly, I keep seeing the same issues over and over. Beautiful dimensions. Great overall design. But the holes? They’re a mess.
In this article, I want to focus on two types of holes I see all the time: countersunk holes and flanged holes. When should you use which one? What rules should you follow? And how do you make sure your part can actually be made?
If you’re looking for custom sheet metal fabrication services that actually pay attention to these details, read on.
What Are These Holes?
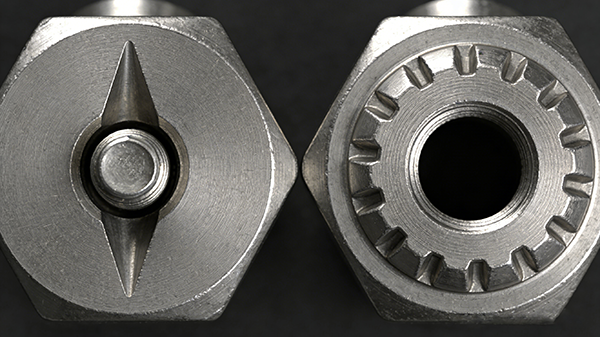
Countersunk holes have a cone-shaped cut around the top. You put a flathead screw in, and the head sits flush with the metal surface. No bumps. No snagging.
Flanged holes (also called extruded holes) are different. You pull material up from the sheet to create a raised collar around the hole. That collar gives you more thread to grab onto. No need for a separate nut or thicker material.
Both have their uses. Both have their own rules.
When to Use Countersunk Holes
Countersunk holes are perfect when you need a flat surface. Think about a product where people touch the surface. Or where another part slides over it. Or you just want it to look clean.
Countersunk holes work best when:
You need the screw head flush or below the surface
Your material is thick enough (2mm or more)
The screw head won’t take heavy side loads
Design Rules for Countersunk Holes
Here’s what I wish every designer knew.
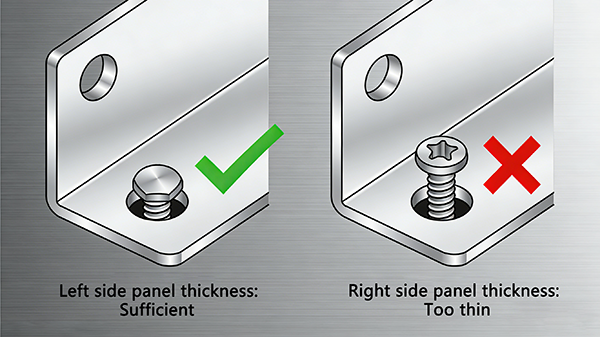
Rule 1: Watch Your Material Thickness
Standard countersunk screws have a head angle of 82 degrees (US) or 90 degrees (metric). The thinner your material, the shallower the countersink—and the more your screw head sticks up.
What I tell customers: For 90-degree metric screws, your material should be at least 60% of the screw head diameter. A 10mm flathead screw needs at least 6mm thick material to sit flush.
Rule 2: Get the Hole Size Right
The clearance hole for the screw body needs to be just right. Too small and the screw won’t go in. Too large and the head wobbles.
What I tell customers: Follow a standard clearance hole chart. For an M5 countersunk screw, make your clearance hole about 5.5mm. The countersink diameter will be around 11mm.
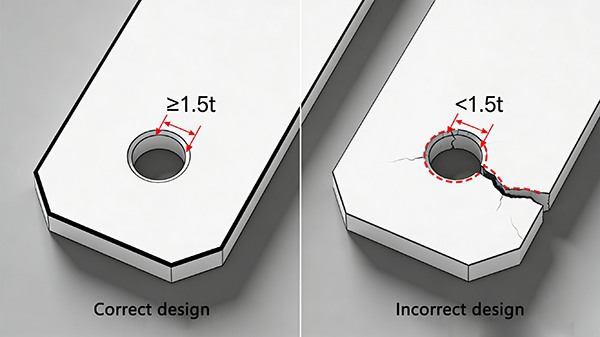
Rule 3: Keep Countersinks Away from Edges
A countersink removes material around the hole. Put it too close to the edge, and you weaken the edge. Sometimes you break right through it.
What I tell customers: Keep the edge of your countersink at least 1.5 times the material thickness away from any part edge.
When to Use Flanged Holes
Flanged holes are your best friend when you have thin sheet metal but need a strong thread.
Flanged holes work best when:
You’re working with thin material (1mm to 2.5mm)
You need more thread engagement than your material thickness gives you
You don’t want to mess with weld nuts or rivet nuts
Your parts will be assembled and taken apart multiple times
Design Rules for Flanged Holes
Flanged holes look simple. They’re not.
Rule 1: Material Choice Is Huge
Different metals stretch differently. Soft aluminum stretches great. Stainless steel? Much harder to form.
What I tell customers: For stainless steel flanged holes, you’ll need a bigger starting hole and multiple forming steps. For aluminum, one step usually works. Talk to your custom sheet metal fabrication services provider about your material.
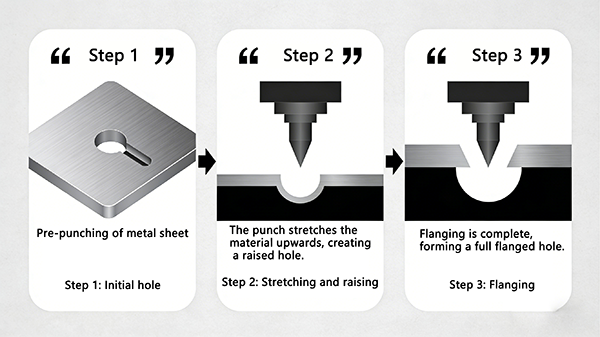
Rule 2: The Starting Hole Size Is Everything
The hole you punch before forming the flange decides everything. Too small and the material tears. Too large and you don’t get enough height.
What I tell customers: There’s a formula for this. But honestly? Let your fabricator do the math. We have tables for exactly this.
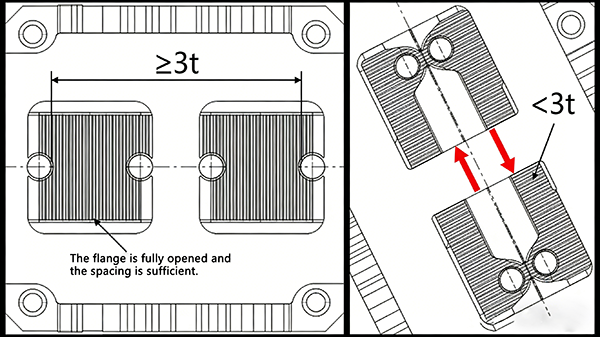
Rule 3: Flanged Holes Need Breathing Room
When you form a flange around a hole, the material pulls from the surrounding area. If your hole is too close to something else, you’ll get distortion.
What I tell customers: Keep at least three times the material thickness between the edge of your flanged hole and any other feature—bends, edges, or other holes.
Countersunk vs Flanged: Which One Should You Pick?
| Factor | Countersunk Hole | Flanged Hole |
|---|---|---|
| Best for thicker material | Yes | No (thin only) |
| Gives you a flush surface | Yes | No |
| Adds thread engagement | No | Yes |
| Works on thin sheet | No | Yes |
| How hard to make | Easy | Medium to hard |
| Cost | Lower | Higher |
Common Mistakes I See
Mistake 1: Countersinking thin material
You end up with a hole almost through the whole thickness. The screw head has nothing to sit on. Result? Loose screw.
Mistake 2: Flanging without enough material around the hole
The flange tears or comes out uneven. The thread you counted on never forms properly.
Mistake 3: Using the wrong screw type
A flathead screw needs a countersunk hole. A pan head needs a straight hole. Double-check before you send the drawing.
How to Work with Your Fabricator
After twenty years, here’s my best advice.
Tell us what you’re connecting. Two sheet metal parts bolted together? A bracket to a frame? The more we know, the more we can help.
Send a sample if you have one. Got an existing screw? Send it to us. We can test the fit before production.
Ask us to quote both options. Not sure which hole is better? Get pricing on both. The cost difference might decide for you.
Trust us on the details. We do this every day. If we say something won’t work, there’s a reason.
The Bottom Line
Good connection design isn’t rocket science. But you do have to think about how your part will actually be made.
Countersunk holes give you a clean, flush surface but need thicker material. Flanged holes let you add thread engagement to thin sheet but take more skill to form right.
The best custom sheet metal fabrication services providers will help you pick the right option. They’ll catch your mistakes before they turn into expensive problems.
Next time you design a sheet metal part with connection features, ask yourself: countersunk or flanged? Then design around that choice.
Need help with your sheet metal design? Send us your drawing. We’ll review your connection features and tell you what works, what doesn’t, and how to make it better.
We reply within 24 hours.