I’ve been looking at sheet metal designs for nearly twenty years. And I can tell you, some mistakes show up over and over again.
The frustrating part? Most of these mistakes are easy to avoid—if you know what to look for. The expensive part? Finding out about them after the parts are already cut.
Let me walk you through the most common sheet metal design mistakes I see, and more importantly, how to fix them before they cost you time and money.
1. Designing Sharp Internal Corners
Here’s a mistake I see constantly. An engineer designs a part with a perfect 90-degree internal corner. Looks great on the screen. But when we go to machine it, we have a problem.
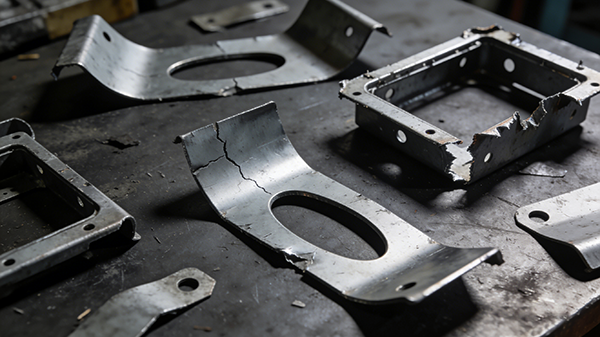
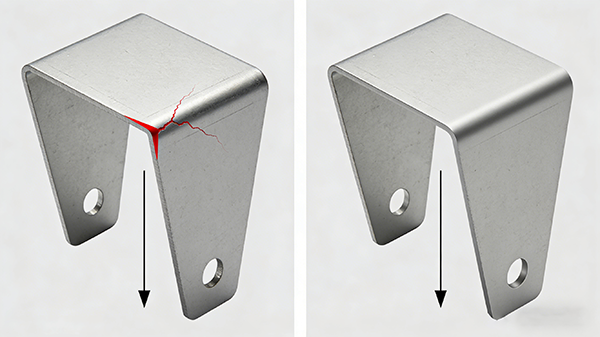
Here’s the reality: every cutting tool has a radius. A laser beam has a width. A punch has a shape. You can’t create a truly sharp internal corner in sheet metal. When you try, you either get a radius anyway, or you end up with stress concentration that can lead to cracking.
How to avoid it:
Design internal corners with a radius at least half the material thickness. Better yet, make it equal to the material thickness. For most applications, a 1mm to 3mm radius works perfectly.
If you absolutely need a sharp corner for assembly, add a small relief cut. It’s a tiny notch that allows the corner to be “sharp” for fit while still being manufacturable.
Why it matters:
Sharp corners create stress points that can crack during bending or under load. Round corners also make the part stronger and easier to manufacture.
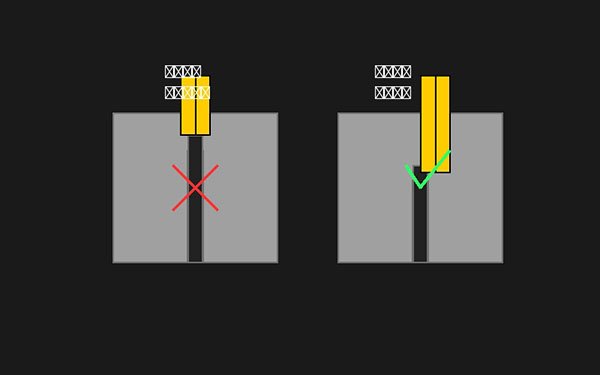
2. Placing Holes Too Close to Bend Lines
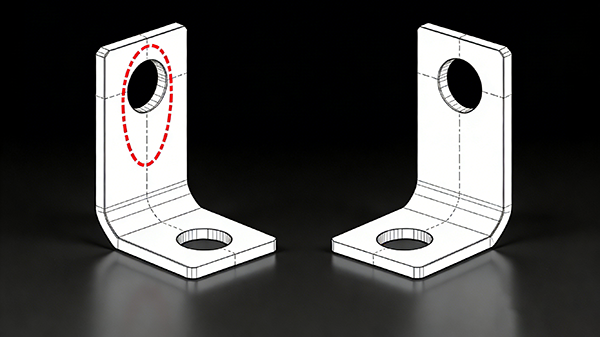
This one hurts to watch. A beautifully designed part with perfectly placed holes goes into the press brake. When it comes out, those once-perfect holes are now stretched into ovals. Sometimes they’re cracked. Sometimes the whole area around the hole is distorted.
How to avoid it:
Keep holes at least 2.5 times the material thickness away from any bend line. If your material is 1.5mm thick, that means at least 3.75mm from the bend.
If you can’t move the hole, consider machining it after bending. Yes, it adds an operation. But it’s cheaper than scrapping the whole part.
Why it matters:
When metal bends, the material on the outside stretches. If there’s a hole in that stretch zone, it gets pulled out of shape. Keep holes in the neutral axis of the bend where the material doesn’t stretch or compress.
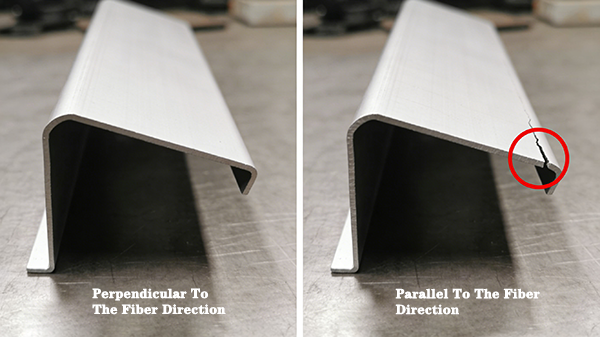
3. Ignoring Grain Direction
This is one of those things that’s easy to miss if you don’t work with metal every day.
Sheet metal comes from rolling mills. The rolling process creates a grain structure in the metal. Bending across the grain is easier and less likely to crack. Bending along the grain? That’s when you start seeing cracks on the outside of the bend.
How to avoid it:
Specify the grain direction on your drawing if it matters for your part. For critical bends, always bend across the grain.
If you’re not sure, talk to your fabricator. We can usually orient the parts on the sheet to optimize bend direction.
Why it matters:
Bending along the grain can cause micro-cracks on the outside of the bend. In high-stress applications, those micro-cracks can grow over time and lead to failure.
4. Over-Tolerancing Everything
I get it. You want your parts to fit perfectly. So you put ±0.1mm on every dimension. It seems like the safe thing to do.
Here’s what actually happens. Your parts cost more. They take longer to make. Your reject rate goes up. And most of those tight tolerances? You didn’t need them.
How to avoid it:
Ask yourself: which dimensions actually matter for how this part functions? Usually, it’s only three to five features per part. Put your tight tolerances there. Let everything else breathe.
Standard sheet metal tolerances are around ±0.2mm to ±0.5mm for most features. If you can live with that, your parts will be faster and cheaper.
Why it matters:
Tight tolerances cost money. They require slower machines, more inspection, and more scrap. Use them only where you need them.
5. Not Accounting for Material Thickness
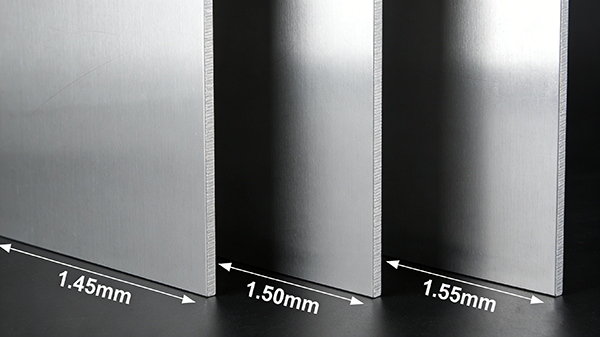
This mistake usually shows up in assemblies. You design two parts to fit together perfectly, assuming they’ll both be exactly 1.5mm thick.
But here’s the thing. 1.5mm material isn’t always 1.5mm. It might be 1.45mm. It might be 1.55mm. That’s within spec. But when you put two parts together, that 0.1mm difference on each can add up.
How to avoid it:
Design for the real world. Use features like tabs and slots that self-align. Allow for some adjustment in assembly. Don’t design parts that require perfect thickness to fit.
If thickness is truly critical, specify a tighter tolerance on the material or machine critical surfaces after forming.
Why it matters:
Material thickness varies. It’s a fact of manufacturing. Designs that don’t account for this variation will have fit issues.
6. Forgetting About Tool Access
I’ve seen designs that look beautiful on screen but are impossible to make. Deep, narrow channels that no tool can reach. Flanges that block access to other features. Holes that are too small for the required depth.
How to avoid it:
Think about how the part will be made. For laser cutting, the beam needs a path. For bending, the tool needs space. For welding, the torch needs to reach the joint.
When in doubt, ask your fabricator. We can usually spot tool access issues before they become problems.
Why it matters:
If a feature can’t be reached, it can’t be made. Redesigning after the fact is expensive and time-consuming. Design with manufacturing in mind from the start.
7. Specifying Unnecessary Welds
Here’s something that surprises a lot of people. More welds doesn’t mean a stronger assembly. Sometimes it means a more distorted assembly.
Every weld adds heat. Every bit of heat adds distortion. If you weld every edge of a box, you’re going to get a box that’s not square anymore.
How to avoid it:
Think about what the assembly actually needs. Does it need to be airtight? Does it need to carry a load? Or does it just need to hold together?
Spot welds or stitch welding are often enough for non-structural assemblies. Continuous welds can be reserved for where they’re actually needed.
Why it matters:
Unnecessary welds add cost, add distortion, and add time. The right weld in the right place is always better than more welds.
8. Not Providing a Tolerance on the Drawing
This one is simple. If you don’t tell me what tolerance you need, I have to guess. And guessing leads to parts that might not do what you need.
How to avoid it:
Put a tolerance block on every drawing. Even if it’s just “ISO 2768-m” or “All dimensions ±0.5mm unless noted.”
For critical features, put the tolerance right next to the dimension. A note like “Ø10 ±0.1” tells me exactly what you need.
Why it matters:
No tolerance means no standard. Different shops use different defaults. A tolerance block eliminates the guesswork.
How to Avoid These Mistakes
Here’s the simple truth. Most sheet metal design mistakes are avoidable.
Talk to your fabricator early. Send us your design before you finalize it. We’ll look at it and tell you what’s going to be easy, what’s going to be hard, and where a small change could save you a lot of trouble.
Build a prototype first. For new designs or complex assemblies, run a few parts before you order hundreds. Test them. Assemble them. See what works and what doesn’t.
Use standard tolerances unless you need tighter. Most features don’t need ±0.1mm. Standard sheet metal tolerances will save you money.
Think about how the part will be made. If you can’t picture it being made, ask someone who does it every day.
Final Thoughts
Sheet metal design isn’t complicated. But it does have its own rules. Most of them come down to one simple idea: design for how the material actually behaves.
Avoid sharp corners. Keep holes away from bends. Pay attention to grain direction. Use tight tolerances only where you need them. Think about tool access. Weld only what needs welding. And always, always put a tolerance on your drawing.
We’ve been doing this for twenty years. We’ve seen every mistake on this list—and made a few ourselves along the way. That’s how we learned what works and what doesn’t.
If you’re working on a sheet metal design, send it our way. We’re happy to take a look and help you avoid the common pitfalls before they become expensive problems.
Have questions about your sheet metal design? Send us your drawing. We’ll review it and give you honest feedback on potential issues and how to fix them.